iPhoneからAppleTVへのAIrPlayが、最近つながらなくなっていた。原因不明で困っていたが、対象法を見つけた。
iPhoneやiPadから急にAirPlayできなくなったときの対処法 | AppiOS
なんと、機内モードをOn/Offするだけ。つながらなくなったのは、今いるWiFiネットワークの情報が違っているらしく、これをリセットすればよいだけだった。
iPhoneからAppleTVへのAIrPlayが、最近つながらなくなっていた。原因不明で困っていたが、対象法を見つけた。
iPhoneやiPadから急にAirPlayできなくなったときの対処法 | AppiOS
なんと、機内モードをOn/Offするだけ。つながらなくなったのは、今いるWiFiネットワークの情報が違っているらしく、これをリセットすればよいだけだった。
参考:Tutorial: Building 'Shiny' Applications with R
Shinyのスライダーは、チュートリアルのexample05に使い方がまとめられている。
1)sliderInput("変数名","表示名",min=最小値, max=最大値, value=初期値)
sliderInput("integer", "Integer:",
                min=0, max=1000, value=500),
2)sliderInput("変数名","表示名",min=最小値, max=最大値, value=初期値, step=刻み幅)
    # Decimal interval with step value
    sliderInput("decimal", "Decimal:",
                min = 0, max = 1, value = 0.5, step= 0.1),
3)sliderInput("変数名","表示名",min=最小値, max=最大値, value=c(領域下端、領域上端))
    # Specification of range within an interval
    sliderInput("range", "Range:",
                min = 1, max = 1000, value = c(200,500)),
4)sliderInput("変数名","表示名",min=最小値, max=最大値, value=初期値, step=刻み幅,
format=書式, locale=, animate=TRUE/FALSE)
    # Provide a custom currency format for value display, with basic animation
    sliderInput("format", "Custom Format:",
                min = 0, max = 10000, value = 0, step = 2500,
                format="$#,##0", locale="us", animate=TRUE),
5)sliderInput("変数名","表示名",最小値, 最大値, 初期値, step=刻み幅,
animate=animationOptions(interval=インターバル, loop=T/F))
    # Animation with custom interval (in ms) to control speed, plus looping
    sliderInput("animation", "Looping Animation:", 1, 2000, 1, step = 10,
                animate=animationOptions(interval=300, loop=T))
参考:Tutorial: Building 'Shiny' Applications with R
Shinyの最大の特長が"Reactivity Programming"だ。Shinyのインタラクティビティは、
ユーザ入力>R言語>ウェブ出力
を自動的に実行することで実現されている。入力値や関数の変更を評価し、必要に応じてRコードを再実行するしくみがReactivityで、ShinyはReactivityライブラリを提供している。Reactivity Programmingでは、変更を陽にモニターする必要はない。
次のExampleコードを見てみる。
ui.R
library(shiny)

# Define UI for dataset viewer application
shinyUI(pageWithSidebar(

  # Application title
  headerPanel("Reactivity"),

  # Sidebar with controls to provide a caption, select a dataset, and
  # specify the number of observations to view. Note that changes made
  # to the caption in the textInput control are updated in the output
  # area immediately as you type
  sidebarPanel(
    textInput("caption", "Caption:", "Data Summary"),

    selectInput("dataset", "Choose a dataset:",
                choices = c("rock", "pressure", "cars")),

    numericInput("obs", "Number of observations to view:", 10)
  ),


  # Show the caption, a summary of the dataset and an HTML table with
  # the requested number of observations
  mainPanel(
    h3(textOutput("caption")),

    verbatimTextOutput("summary"),

    tableOutput("view")
  )
))
server.R
library(shiny)
library(datasets)

# Define server logic required to summarize and view the selected dataset
shinyServer(function(input, output) {

  # By declaring datasetInput as a reactive function we ensure that:
  #
  #  1) It is only called when the inputs it depends on changes
  #  2) The computation and result are shared by all the callers (it
  #     only executes a single time)
  #  3) When the inputs change and the function is re-executed, the
  #     new result is compared to the previous result; if the two are
  #     identical, then the callers are not notified
  #
  datasetInput <- reactive(function() {
    switch(input$dataset,
           "rock" = rock,
           "pressure" = pressure,
           "cars" = cars)
  })

  # The output$caption is computed based on a reactive function that
  # returns input$caption. When the user changes the "caption" field:
  #
  #  1) This function is automatically called to recompute the output
  #  2) The new caption is pushed back to the browser for re-display
  #
  # Note that because the data-oriented reactive functions below don't
  # depend on input$caption, those functions are NOT called when
  # input$caption changes.
  output$caption <- reactiveText(function() {
    input$caption
  })

  # The output$summary depends on the datasetInput reactive function,
  # so will be re-executed whenever datasetInput is re-executed
  # (i.e. whenever the input$dataset changes)
  output$summary <- reactivePrint(function() {
    dataset <- datasetInput()
    summary(dataset)
  })

  # The output$view depends on both the databaseInput reactive function
  # and input$obs, so will be re-executed whenever input$dataset or
  # input$obs is changed.
  output$view <- reactiveTable(function() {
    head(datasetInput(), n = input$obs)
  })
})
ui.Rでは、
を定義している。
server.Rの先頭が、
shinyServer(function(input, output) {となっている。関数に渡されるinput, output各オブジェクトがuiとのやり取りを媒介している。
inputオブジェクトはウェブページ上の入力をリスト形式で取得する。Reactivityは通常の関数を"reactive"関数に渡すことで実現する。下の例では、datasetInputをreactive関数として宣言している。
datasetInput <- reactive(function() {
   switch(input$dataset,
          "rock" = rock,
          "pressure" = pressure,
          "cars" = cars)
})
一方、出力はoutputオブジェクトを使う。下では、textinput "caption"への入力を、そのまま"caption"へ文字出力(reactiveText)している。
 output$caption <- reactiveText(function() {
    input$caption
  })
次では、datasetinputの再実行(つまり、input$datasetの変更)を見て、summary関数の出力を、outputオブジェクトの"summary"として表示(reactivePrint)している。
output$summary <- reactivePrint(function() {
    dataset <- datasetInput()
    summary(dataset)
  })
こちらは、datasetInputの再実行(つまり、input$datasetの変更)または、numericInput"obs"の変更が生じた場合に、outputオブジェクトの"view"が変更される(reactiveTable)。
output$view <- reactiveTable(function() {
    head(datasetInput(), n = input$obs)
  })
参考: Tutorial: Building 'Shiny' Applications with R
ui.R
library(shiny)

# Define UI for dataset viewer application
shinyUI(pageWithSidebar(

  # Application title
  headerPanel("Shiny Text"),

  # Sidebar with controls to select a dataset and specify the number
  # of observations to view
  sidebarPanel(
    selectInput("dataset", "Choose a dataset:",
                choices = c("rock", "pressure", "cars")),

    numericInput("obs", "Number of observations to view:", 10)
  ),

  # Show a summary of the dataset and an HTML table with the requested
  # number of observations
  mainPanel(
    verbatimTextOutput("summary"),

    tableOutput("view")
  )
))
ui.Rの構造は、
shinyUI
    pageWithSidebar
        headerPnael
        sliderPanel
            selectInput
            numericInput
        mainPanel
            verbatimTextOutput
            tableOutput
となっている。ブロック単位が明確でわかりやすい。また「位置」の情報は必要なく、ブラウザ画面のサイズにあわせて自動的にレイアウトしてくれる。
server.R
library(shiny)
library(datasets)

# Define server logic required to summarize and view the selected dataset
shinyServer(function(input, output) {

  # Return the requested dataset
  datasetInput <- reactive(function() {
    switch(input$dataset,
           "rock" = rock,
           "pressure" = pressure,
           "cars" = cars)
  })

  # Generate a summary of the dataset
  output$summary <- reactivePrint(function() {
    dataset <- datasetInput()
    summary(dataset)
  })

  # Show the first "n" observations
  output$view <- reactiveTable(function() {
    head(datasetInput(), n = input$obs)
  })
})
"shinyServer(function(input, output) {"に続けて、処置を書く。
input$UI名
で入力を取り出す。例えば、スライダーdatasetの値を受け取るには、
input$dataset
とする。
datasetInput <- reactive(function() {.....} は、reactive関数の部分。この表現は重要。
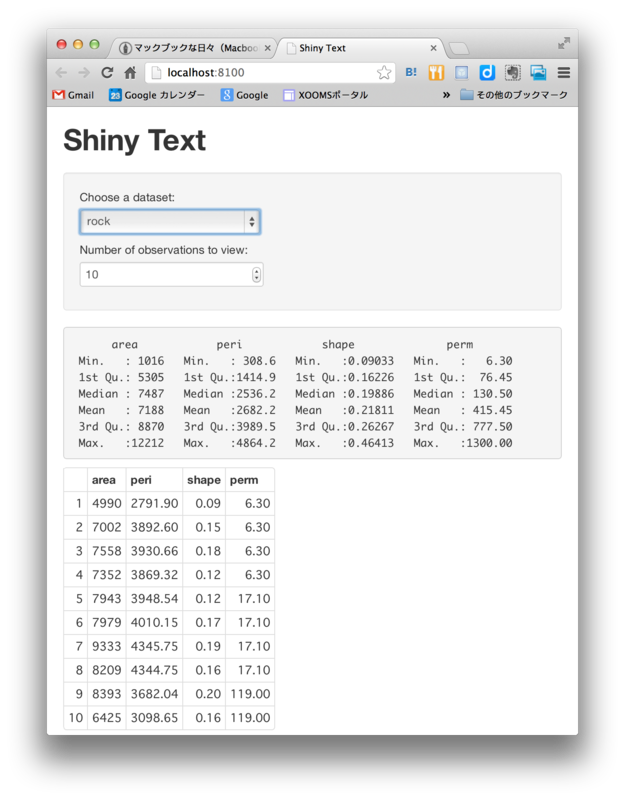
> runApp("フォルダ名")で実行すると、ブラウザで次の画面が表示される。

プルダウンセレクターと数値カウンターの入力は、即座にプロットに反映される。
参考:Tutorial: Building 'Shiny' Applications with R
Shinyのアプリは
アプリ名を表すフォルダの下に、
の2つのファイルが存在しなければならない。
これら以外のスクリプトやデータがあってもよい。
例えば、"ex01"と言うフォルダを作り、その下に次の2つのRファイルをを作る。
ui.R
library(shiny)

# Define UI for application that plots random distributions
shinyUI(pageWithSidebar(

  # Application title
  headerPanel("Hello Shiny!"),

  # Sidebar with a slider input for number of observations
  sidebarPanel(
    sliderInput("obs",
                "Number of observations:",
                min = 0,
                max = 1000,
                value = 500)
  ),

  # Show a plot of the generated distribution
  mainPanel(
    plotOutput("distPlot")
  )
))
server.R
library(shiny)

# Define server logic required to generate and plot a random distribution
shinyServer(function(input, output) {

  # Function that generates a plot of the distribution. The function
  # is wrapped in a call to reactivePlot to indicate that:
  #
  #  1) It is "reactive" and therefore should be automatically
  #     re-executed when inputs change
  #  2) Its output type is a plot
  #
  output$distPlot <- reactivePlot(function() {

    # generate an rnorm distribution and plot it
    dist <- rnorm(input$obs)
    hist(dist)
  })
})
実行は、
> runApp("アプリ名(フォルダ名)")とする。
上の例の場合、アプリフォルダを含むフォルダに作業ディレクトリを変更し(トップメニューの「その他」-「作業ディレクトリの変更...」)、コンソールに次を入力する。
> runApp("ex01")
Rでウェブアプリが作ることができるShinyがリリースされた。
1.Shinyの特長
2.インストール手順
参考:shinyでシャイニイイイイイイイイイイイイイイイイイイイイイイイイイ - BOD
1) R(今回は64bitバージョン64.app)を起動
2) コンソール上で次のように入力(コピペでOK)
options(repos=c(RStudio='http://rstudio.org/_packages', getOption('repos')))
install.packages('shiny')3)CRANのミラーサイトの選択ウィンドウが現れる。近くのミラーサイトを選択(今回は、Japan, Hyogoを選んだ)
4)一連のインストールが始まる
利用可能なパッケージのバイナリがありました
  (インストールされます)
.....
5)次のような表示が出れば、インストールは終了。
 ダウンロードされたパッケージは、以下にあります
 	/var/folders/1d/g6jglkjx3lbbxhjltf9g_b600000gn/T//RtmpOXPBCC/downloaded_packages
3.サンプル・コード
コンソールに次のように入力
> library(shiny)
> runExample("01_hello")
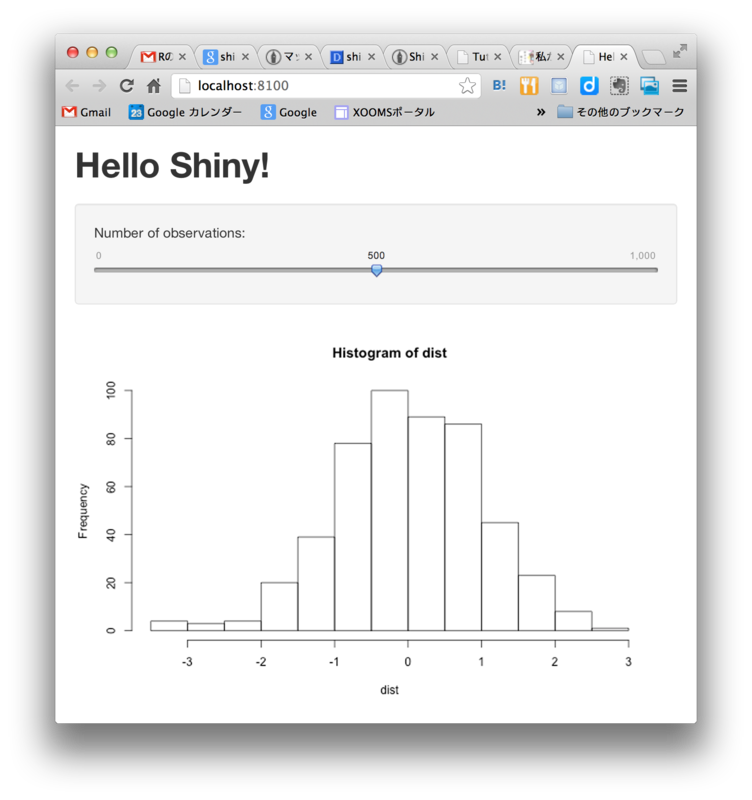
ウェブブラウザが起動し、次のグラフが表示される。スライダを操作するとグラフが変化する。
